
The last great cavalry charge in history happened on Halloween 1917 in the Middle East
On 31 October 1917, during the final stages of the Sinai and Palestine campaign, Australian mounted troops carried out what many historians regard as the last successful large-scale cavalry charge against entrenched infantry in modern warfare.
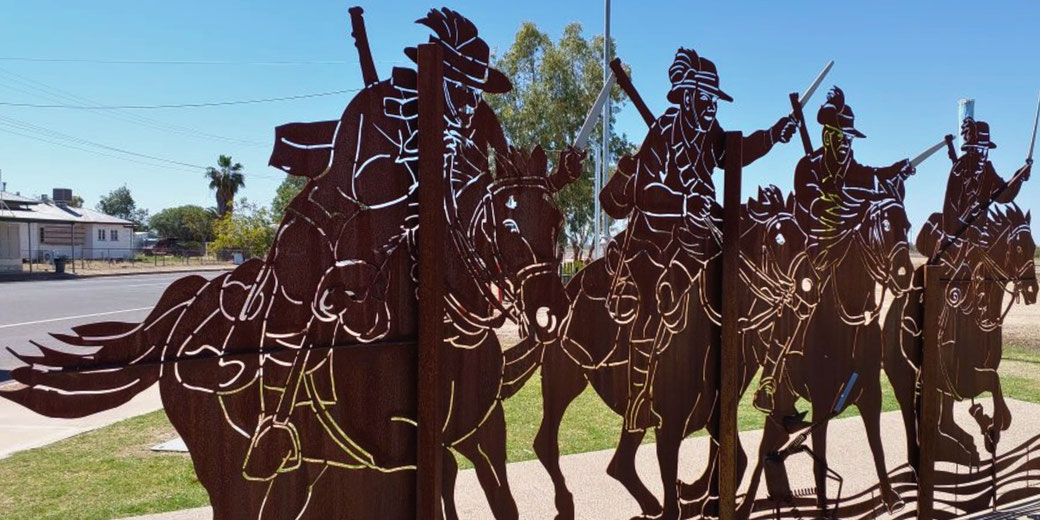
As the sun dipped below the dry hills near Beersheba, around 800 horsemen from the 4th Australian Light Horse Brigade rode forward in a sudden and violent attack that broke through Ottoman lines and captured the town.
With bayonets fixed like lances and rifles slung across their backs, they galloped across open desert under artillery fire, and as a result they secured a tactical victory and also the wells that made further advance into Palestine possible.
Why were Australians involved in WWI?
At the outbreak of war in August 1914, Australia joined the conflict as part of the British Empire, and public support for joining the war was almost immediate and very widespread.
Tens of thousands volunteered within weeks, because they believed that service would show Australia’s loyalty to the Empire and protect its reputation with other nations.
Although many expected to fight in Europe, a significant portion of the Australian Imperial Force (AIF) remained in Egypt, where the British command required troops to protect the Suez Canal and prepare for operations against the Ottoman Empire.
After the Gallipoli campaign had ended in 1915, most Australian infantry had already departed for the trenches of the Western Front.
However, the Australian mounted troops remained in the Middle East, where their endurance in dry conditions and their horsemanship often made them especially effective in later desert campaigns.
Since the terrain and supply demands of the region were so different from the conditions in France, the Light Horse brigades retained their horses and were tasked with patrolling long distances and conducting raids that supported larger offensives during the British advance toward Palestine.
The Sinai and Palestine Campaign
After British control over the Suez Canal had been secured, commanders sought to push eastward and drive Ottoman forces out of the Sinai Peninsula.
In order to do this, they constructed a railway and water pipeline across the desert, which allowed the constant movement of troops and supplies toward enemy territory.
Under the leadership of General Archibald Murray, and later General Edmund Allenby, British and Dominion forces had gradually captured key positions at Romani and Magdhaba, as well as Rafa, and this preparation allowed a campaign that would move deep into land that was controlled by the Ottoman Empire.
Australian mounted units often played an important role during this phase. Their speed and familiarity with open, dry terrain allowed them to move around Ottoman defenders and carry out quick attacks against isolated outposts.
As the British advanced toward southern Palestine, the Ottomans fortified a defensive line that was anchored at Gaza and Beersheba.
In March and April of 1917, two major attempts to storm Gaza failed, as strong defensive positions and poor coordination left Allied forces unable to breach the line.
Because of this setback, British high command shifted its attention to Beersheba, where a new strategy would be tested.
Why did the British target Beersheba?
At the eastern end of the Ottoman defensive line, Beersheba seemed to offer both a military opportunity and a vital need.
Although Gaza had received many extra troops and been turned into a fortress, Beersheba was still less heavily fortified and was defended by fewer troops than those who guarded Gaza.
Its location on the desert flank of the Ottoman line exposed it to attack from multiple directions, which gave Allenby a chance to break the stalemate if he moved quickly.
Importantly, the town controlled several deep wells that stored enough water to supply entire divisions.
British engineers had identified at least seventeen main wells in the area. Since any attacking force required secure access to water immediately after crossing the desert, the need to seize the wells intact became just as important as defeating the garrison.
British intelligence suggested that if an attack could be launched from the east and carried out with sufficient speed, it might go around the strongest Ottoman positions and catch the defenders off guard.
For that reason, Allenby designed a plan that involved a false attack against Gaza, while his main force, supported by infantry and artillery, together with mounted troops,would strike Beersheba from an unexpected direction.
Who was the 4th Australian Light Horse Brigade?
Created in February 1917 and placed under the command of Brigadier General William Grant, the 4th Australian Light Horse Brigade consisted of two regiments, the 4th and the 12th, which took part in the charge at Beersheba.
A third regiment was the 11th and it was assigned to the brigade, but it was detached at the time.
Raised mainly from rural districts, its soldiers included former stockmen and drovers, along with horse breakers who had years of experience with animals in difficult conditions.
Their practical knowledge of survival in open country and their ability to cover long distances at speed gave them a distinct advantage in desert warfare.
Most of their horses were Australian Walers, valued for their endurance and strength in extreme heat.
As mounted infantry, they typically rode into battle and then dismounted to fight on foot.
However, they retained the training and flexibility to conduct mounted assaults when necessary.
Earlier in the campaign, individual regiments had participated in actions at El Arish and Rafa, where their mobility and coordination contributed to success.
By the time the Beersheba operation began, they had moved into position near the town of Karm, and they waited for orders.
While few expected them to charge directly into fortified positions, the events of 31 October created exactly such a demand.
Why was the decision made to charge?
By the afternoon of 31 October 1917, British infantry advancing from the southwest had made progress against Ottoman defences but had not yet reached the town.
The heat and the broken terrain, together with the resistance of the defenders, had slowed the advance to the point where the whole operation risked coming to a halt.
Since the success of the entire offensive depended on the capture of the town’s water wells, further delay could have forced the attackers to retreat and abandon the plan.
As a result, General Harry Chauvel was commander of the Desert Mounted Corps and ordered the 4th Light Horse Brigade to conduct a mounted charge against the eastern defences of Beersheba.
Although such an action carried significant risk, it also offered the best chance of taking the town before nightfall.
The plan required speed and surprise, as the open ground between the assembly area and the Ottoman trenches left little room for error.
Without hesitation, Brigadier General Grant organised his regiments for the assault, instructing the men to fix their bayonets to their rifles and prepare to ride into enemy fire.
The charge: moment by moment
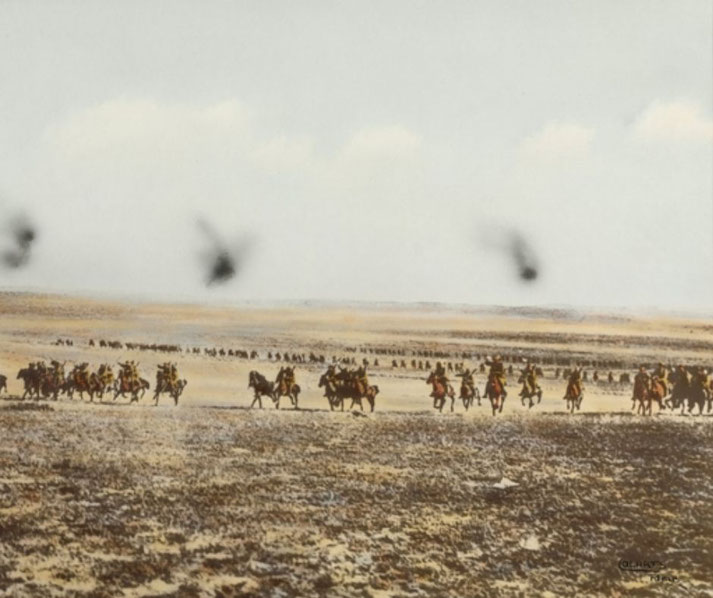
At 4:30 p.m., the 4th and 12th Light Horse Regiments formed up in open desert, roughly six kilometres from Beersheba.
The order to advance came quickly, and the troopers began to trot forward in extended line formation.
As the distance closed, Turkish gunners opened fire with artillery and rifles, but the Australians pressed on, and they gained speed and sent up massive plumes of dust that obscured their numbers.
Because the dust made it hard to see, Ottoman troops could not accurately work out the size or direction of the attack.
As they reached full gallop, the horsemen lowered their bayonets and braced for impact.
Some leapt their mounts directly over the trenches and dismounted behind the enemy line, while others dismounted in front and stormed the position on foot.
The speed of the charge disrupted the Ottoman defence so completely that many defenders surrendered without firing, and others fled into the town.
The local Ottoman command structure struggled to respond before the position collapsed.
By 6:00 p.m., Australian troops had captured Beersheba, and they had begun to secure the wells before they could be sabotaged.
Between 700 and 1,000 prisoners were taken, and Australian casualties totalled about 31 killed and 36 wounded, a number that was relatively low considering the nature of the assault.
What were the consequences of the charge?
The fall of Beersheba effectively broke the eastern flank of the Ottoman defensive line and made the Gaza position impossible to hold.
Within days, Turkish forces withdrew from Gaza, and British forces began to advance rapidly into southern Palestine.
By December, Jerusalem had been captured, and this capture had provided both strategic and symbolic victory for the Allies.
The success of the operation at Beersheba helped to make further progress possible and significantly weakened Ottoman control over the region.
The charge itself quickly became an important symbol of disciplined courage and individual initiative.
Australian Light Horse units earned international praise for achieving what many believed impossible in an age of mechanised war.
While mounted attacks occurred later in the conflict, such as at Komarów during the Polish–Soviet War, none clearly matched the size or success of the Beersheba charge against entrenched infantry.
It is still seen as the last great cavalry charge to succeed in those conditions.
To many Australians, the charge represented the endurance and ability to adjust of soldiers who thrived in strange and very difficult environments.
It demonstrated how, under the right conditions, speed and shock could achieve victory where brute force could not.
As such, the story of Beersheba continues to be remembered as more than a footnote in World War I and as an important moment in the history of modern warfare.
The 100th anniversary of the battle in 2017 was marked with commemorative events in both Israel and Australia, honouring the men and horses who carried out one of the most widely recognised feats of mounted warfare in the twentieth century.